
 ES
ES EN
EN RU
RU SA
SAЗамена тормозной камеры — это контролируемая, повторяемая работа, которую компетентный техник может выполнить примерно за 60–90 минут, но правила безопасности абсолютны: всегда слейте воздух из воздушной системы и механически зафиксируйте пружинный тормоз, прежде чем прикасаться к камере пружинного тормоза. Наиболее распространенной причиной замены тормозной камеры является утечка воздуха из диафрагмы, из-за которой камера теряет приложенное усилие. Другие симптомы включают видимые трещины в корпусе, сломанную выжимную шпильку или ход толкателя, превышающий предел регулировки. В этом руководстве вы найдете пошаговую процедуру, конкретные измерения, которые имеют значение при заказе замены, а также ошибки, которые приводят к преждевременному выходу из строя. Для получения полного обзора нашего ассортимента тормозных камер посетите индекс продукта .
Контент
- 1 Что такое тормозная камера и когда ее нужно заменять?
- 2 Замена тормозной камеры: пошаговая процедура
- 3 Как правильно выбрать сменную тормозную камеру
- 4 Стоимость и трудозатраты на замену тормозной камеры
- 5 Замена тормозной камеры или ремонт: что лучше?
- 6 Распространенные ошибки, которых следует избегать при замене тормозной камеры
- 7 Техническое обслуживание и осмотр после замены
- 8 Часто задаваемые вопросы по замене тормозной камеры
- 8.1 Сколько времени занимает замена тормозной камеры?
- 8.2 Нужно ли запирать пружину перед снятием камеры пружинного тормоза?
- 8.3 В чем разница между тормозными камерами типа 20 и типа 24?
- 8.4 Можно ли заменить только диафрагму, а не всю тормозную камеру?
- 8.5 Почему моя новая тормозная камера пропускает воздух после установки?
- 8.6 Как часто следует менять тормозные камеры?
Что такое тормозная камера и когда ее нужно заменять?
Тормозная камера преобразует давление сжатого воздуха в линейную механическую силу, которая толкает регулятор зазора и вращает распределительный вал, приводя в действие тормозные колодки. Ключевым фактом для тех, кто задумывается о замене, является то, что тормозная камера в большинстве случаев представляет собой герметичный, необслуживаемый компонент: диафрагма, пружина и корпус выполнены как единое целое. Вы можете узнать, что пришло время заменить его, когда ход толкателя превышает предел, установленный производителем автомобиля, когда из камеры заметно пропускает воздух через зажимное кольцо или пластиковый сапун, или когда корпус подвергается коррозии или деформируется. Если камера пружинного тормоза выходит из строя в стояночном положении, пружина может оставаться сжатой только за счет сепаратора; в противном случае он будет постоянно оказывать давление, поэтому замену нельзя отложить.
Замена тормозной камеры: пошаговая процедура
Правильная последовательность замены тормозной камеры каждый раз одинакова: зафиксируйте автомобиль, выпустите весь накопленный воздух, зафиксируйте пружинный тормоз, отсоедините вилку и воздухопровод, снимите монтажный зажим, установите новую камеру, снова подсоедините воздухопровод и проверьте ход. Выполнение этих действий в таком порядке обеспечивает безопасность работы и предотвращает преждевременный износ нового компонента.
Подготовка к технике безопасности перед началом работы
Первый и самый важный шаг — заблокировать колеса и заблокировать транспортное средство от любого движения, поскольку камера пружинного тормоза удерживает огромную запасенную силу, даже когда из воздушной системы опорожнен воздух. Прежде чем начать, соберите следующие инструменты.
- Противооткатные упоры для предотвращения скатывания автомобиля
- Защитные очки и прочные перчатки.
- Торцевая головка 1/2 дюйма и набор гаечных ключей
- Инструмент для тормозной пружины, также известный как C-образный крюк или инструмент для разблокировки.
- Проволока или стяжки для фиксации штифта с головкой после его вытягивания.
- Динамометрический ключ для болтов зажима
- Ключи для снятия воздуховодов, чаще всего на 11 мм или 13 мм.
Снятие старой тормозной камеры
Снятие начинается со стравливания давления из воздушных ресиверов, поскольку камера пружинного тормоза все еще может прилагать усилие, даже если магистрали рабочего тормоза пусты. Следуйте этой последовательности, чтобы избежать неожиданного высвобождения энергии.
- Припаркуйтесь на ровной площадке, заблокируйте колеса и включите стояночный тормоз.
- Слейте воздух из резервуаров первичного и вторичного воздуха с помощью сливных клапанов.
- Установите механический сепаратор на пружинный тормоз и зафиксируйте его, надежно закрутив разблокирующий болт.
- Отсоедините воздухопровод от тормозной камеры с помощью соответствующего ключа.
- Снимите штифт с головкой, соединяющий толкатель с регулятором зазора.
- Ослабьте два зажимных болта на кронштейне крепления и снимите старую тормозную камеру.
Установка новой тормозной камеры
Новая тормозная камера устанавливается в порядке, обратном снятию, но три детали определяют разницу между надежной и длительной работой и отказом: чистая монтажная поверхность, правильный момент затяжки зажимных болтов и правильное выравнивание толкателя. Используйте этот порядок установки.
- Перед установкой чего-либо очистите поверхность кронштейна и проверьте его на наличие трещин и деформаций.
- Расположите новую тормозную камеру на кронштейне так, чтобы толкатель совпал с регулятором зазора.
- Затяните болты зажима попеременно и затяните в соответствии со спецификацией производителя.
- Снова подсоедините шплинт и установите новый шплинт.
- Снова подсоедините воздухопровод и убедитесь, что фитинг затянут, но не перетянут.
- Медленно отпустите инструмент для клетки и убедитесь, что пружина возвращается в нормальное положение.
- Создайте давление воздуха и проверьте толкатель, чтобы убедиться в его плавности и отсутствии заеданий.
Как правильно выбрать сменную тормозную камеру
Выбор правильной сменной тормозной камеры — это не выбор самого большого блока на полке; речь идет о соответствии длины хода, размера толкателя и конфигурации порта оригинальному оборудованию. Номер типа камеры, например, Тип 16, 20, 24 или 30, относится к номинальному ходу в миллиметрах и определяет, насколько далеко может перемещаться толкатель. Если вы установите камеру с более коротким ходом, чем оригинал, вы не добьетесь полного контакта тормозной колодки. Если вы установите более длинный ход, толкатель может упереться в корпус и вызвать преждевременный выход из строя.
| Тип | Номинальный ход | Ссылка на модель | Типовой монтаж |
|---|---|---|---|
| Т16 | 16 мм | FA1026A | 24ДД |
| Т20 | 20 мм | FA1079C | 24ДП |
| Т24 | 24 мм | FA1099B | 24ДП |
| Т30 | 30 мм | FA1076A | 30ДД |
При замене тормозной камеры также проверьте расположение и ориентацию воздушного порта. Камеры подразделяются на воздух-внутри и воздух-снаружи в зависимости от того, где воздуховод входит в корпус. Ориентация портов имеет значение, поскольку неправильно выровненный воздухопровод может тереться о подвеску или ось и вызывать утечку. Прежде чем сделать заказ, прочтите табличку с техническими данными на старой камере и запишите номер OEM, тип хода и положение порта. Если OEM-номер не читается, измерьте диаметр зажима и длину толкателя.
Для непосредственной замены вы можете использовать следующие конфигурации тормозных камер из нашего ассортимента:
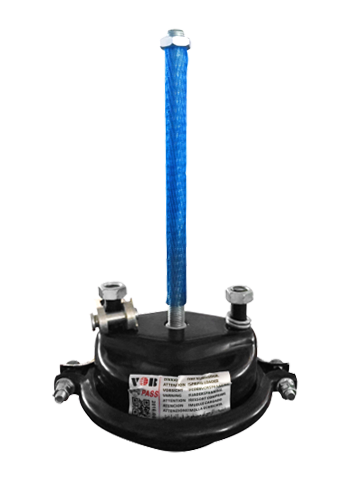 Т24 Brake Chamber for Bus and Trailer Applications Эта тормозная камера T24 предлагает возможность прямой замены тормозных систем автобусов и прицепов, обеспечивая надежную работу. Его доступность обеспечивает экономичный самостоятельный или профессиональный ремонт. Посмотреть продукт →
 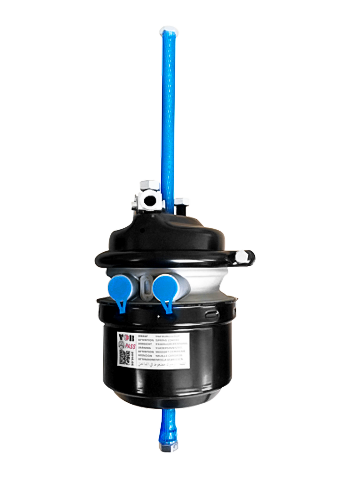 Т16/24DP Air Inside Brake Chamber with Part Numbers Воздушная тормозная камера T16/24DP является прямой заменой и совместима с несколькими номерами деталей. Это надежное решение для обслуживания вашей пневматической тормозной системы. Посмотреть продукт →
 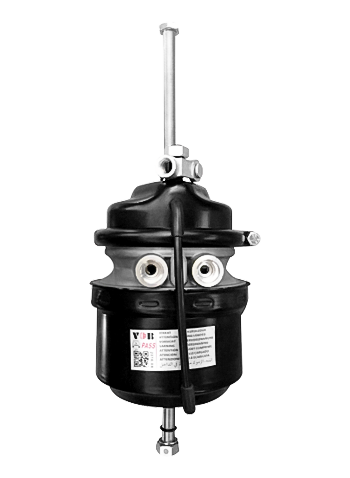 Т16/24DP Air Outside Brake Chamber Replacement Option Эта воздушная внешняя тормозная камера T16/24DP служит прямой заменой деталей определенных номеров. Его конструкция обеспечивает эффективный ремонт тормозной системы коммерческих автомобилей. Посмотреть продукт →
 Стоимость и трудозатраты на замену тормозной камеры
Общая стоимость замены тормозной камеры колеблется от 80 до 300 долларов за детали для одной камеры и от 150 до 450 долларов за работу в коммерческом магазине. Обычно трудозатраты оцениваются как минимум в один час, поскольку процедура включает в себя удушение, дренирование и помещение в клетку, даже если фактическое удаление занимает всего 20 минут. Владельцы автопарков, выполняющие работу самостоятельно, обычно тратят больше на специальный инструмент для клетки, чем на саму камеру, но инструмент окупается после двух или трех работ.
- Детали: 60–180 долларов США за стандартную камеру типа 20/24.
- Детали: 120–250 долларов за камеру дискового тормоза или сверхмощный блок Type 30.
- Труд: 100–200 долларов в час в коммерческой мастерской.
- Итого: 160–450 долларов за ось, в зависимости от типа автомобиля и региона.
Замена тормозной камеры или ремонт: что лучше?
Для пружинной тормозной камеры ремонт тормозной камеры практически никогда не рекомендуется, но рабочую тормозную камеру иногда можно восстановить, если корпус цел. Прямой ответ: в большинстве случаев замена является более безопасным и экономически эффективным вариантом. Комплект для восстановления стоит лишь часть новой камеры, но трудозатраты на разборку, очистку и повторную герметизацию устройства часто превышают время, необходимое для простого прикручивания нового. В камере пружинного тормоза пружина накапливает энергию, которую невозможно безопасно высвободить для замены диафрагмы без специального оборудования. Поэтому практический выбор – полная замена тормозной камеры.
Распространенные ошибки, которых следует избегать при замене тормозной камеры
Самая распространенная ошибка – пропуск шага пружинной клетки. Камера пружинного тормоза, не имеющая сепаратора, может внезапно освободить свою пружину при отвинчивании зажимного кольца, что приведет к серьезной травме или смерти. Вторая ошибка — повторное использование старых зажимных болтов или шплинтов; эти мелкие детали дешевы, но из-за коррозии становятся хрупкими. Третья ошибка — чрезмерная затяжка фитинга воздухопровода, что может привести к сорванию резьбы и сделать камеру невозможной для герметизации. В-четвертых, всегда проверяйте толкатель после установки, даже если тормозная камера новая. Вот что делать и чего избегать.
| Сделай это | Избегайте этого |
|---|---|
| Прежде чем ослаблять зажим, зафиксируйте пружину | Откройте патронник, пока пружина еще взведена. |
| Используйте новые зажимные болты и шплинты. | Повторное использование проржавевшего оборудования |
| Затягивайте болты зажима поочередно. | Полностью затяните один болт перед другим. |
| Проверьте ход толкателя после установки. | Предположим, что новая камера правильно отрегулирована. |
Техническое обслуживание и осмотр после замены
После замены тормозной камеры простой 20-минутный график осмотра продлит срок службы нового блока. Первой проверкой является измерение длины хода при полном торможении, которая должна оставаться близкой к значению, указанному производителем транспортного средства. Вторая проверка — это проверка на утечку мыльной воды фитинга воздухопровода и любых внешних швов. Третья проверка — это визуальный осмотр толкателя и выжимной шпильки на наличие коррозии или трещин. Делайте это при первом интервале технического обслуживания, и вы поймаете ослабленный хомут до того, как он повредит корпус.
Часто задаваемые вопросы по замене тормозной камеры
Это вопросы, которые чаще всего задают владельцы и технические специалисты, собирающиеся заменить тормозную камеру.
Сколько времени занимает замена тормозной камеры?
Опытный техник может выполнить всю работу, включая блокировку и сброс давления, за 60–90 минут. Для ремонта со стороны движения ожидайте двух часов, потому что технику приходится перемещать инструменты и, возможно, придется ждать, пока давление воздуха не увеличится.
Нужно ли запирать пружину перед снятием камеры пружинного тормоза?
Да. Перед открытием зажимного кольца камера пружинного тормоза всегда должна быть механически закреплена в клетке. Это не является обязательным и является самым важным правилом безопасности на работе.
В чем разница между тормозными камерами типа 20 и типа 24?
Разница заключается в номинальном ходе толкателя. Камера типа 20 имеет ход 20 мм, а камера типа 24 — 24 мм. Установка неправильного хода может привести к плохому торможению или преждевременному повреждению толкателя.
Можно ли заменить только диафрагму, а не всю тормозную камеру?
Производители обычно не поддерживают ремонт только диафрагмы в герметичной камере пружинного тормоза, поскольку зажимное кольцо не предназначено для многократной установки и нагрузки. Иногда мастерская может отремонтировать сторону рабочего тормоза старой камеры, но камеру пружинного тормоза безопаснее и быстрее заменить в сборе.
Почему моя новая тормозная камера пропускает воздух после установки?
Наиболее вероятными причинами являются недостаточно затянутое зажимное кольцо, воздушный фитинг с поперечной резьбой или поврежденное уплотнительное кольцо на порту. Повторно затяните болты и осмотрите кромку фитинга, прежде чем прийти к выводу, что сама камера неисправна.
Как часто следует менять тормозные камеры?
Фиксированного временного интервала нет. Замена камер производится при условии — при превышении предельного хода, при течь диафрагмы или при появлении трещин в корпусе. Автопарк, который проверяет тормоза каждые 50 000 миль, может рассчитывать на срок службы камер от 3 до 5 лет при нормальной эксплуатации на шоссе. Полный список нашей тормозной продукции для коммерческого транспорта можно найти на сайте индекс продукта .

 Свяжитесь с нами